Showing posts with label decorated box. Show all posts

Wednesday, 3 April 2024

Conjurer of Dreams: It's About Time


 Hello


Today I'm sharing some projects I made using Conjurer of Dreams images. I hope you'll pop over to the store and take a look at the Digital Art on sale for collage, scrapbooks, journals, cards and more.

The challenge theme this month is It's About Time.

Here is what I made.

A pair of cards


The beautiful backgrounds are from the Blue Space set and the butterflies are from the Bohemian Butterfly set. I printed onto glossy photo paper. The fussy cut butterflies were shaped and glittered and their wings float freely from the card.

PIP Challenges #2413 AG 07/04 Honorable Mention
Crafty Gals Corner #253 AG 09/04
Triple B Challenge April 24 30/04
Daisy Chain Challenge #84 Not Square 30/04

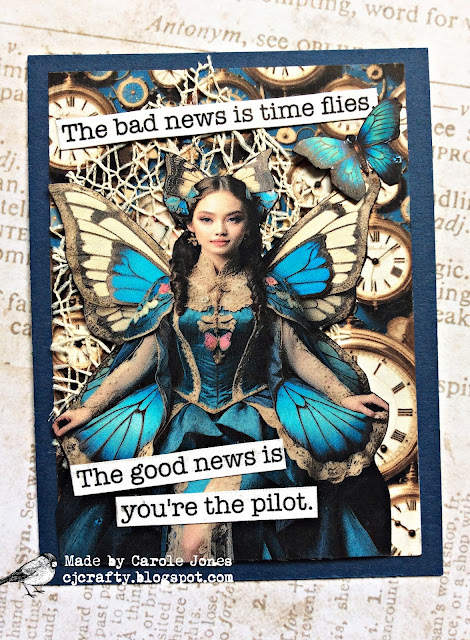
A set of ATCs:


I used the Timeless background set and added the Victorian Butterfly Girls on foam tape for dimension. Beneath each girl is some textured trim. I also added some tiny butterflies from the Bohemian Butterfly set. The 'time' sentiments were typed and printed, then cut into strips.


I decided to add the ATCs to a Distress Oxide backgrounds and popped them on a navy blue card to make cute notecards:


A Perfect Time to Craft April AG 28/04

A decorated gift box:


For this I salvaged a beautiful gold coloured chocolate box and simply printed my favourite Bohemian Butterfly image twice. One image was distressed around the edges and adhered to the top of the box with gold die cut borders placed around the edges.. The second image was fussy cut and adhered in the middle, leaving the butterfly wings free. I added Glossy Accents to the body of the butterfly.

***
And some digital art collages: 


Here are the products I used:

That's all for now.

Please visit the
Conjurer of Dreams Inspiration Group on Facebook (freebies available)

Thanks for stopping by today.

xoxo


Monday, 14 October 2019

* Vera Lane Studio: Lippy and the rest of the Sassy Girls


Hello!
Happy Monday!

It's my DT day at Vera Lane Studio and today I have a project featuring Lippy who was released last week.

Here she is:


She's a girl with attitude, but such a sweetie! She is coloured with Copic pens and, once fussy cut, popped on a background made by applying Brushos through a stencil. This is such a quick, yet fun technique, but I should tell you that all credit goes to the fabulous Tracy Evans who showed me this technique. I have been asked for a tutorial for this technique so I made a short video, should you wish to see it.


Once the card was cut to size I inked the edges, first with Fossilised Amber and then I ran black ink around the very edges. Some white Posca paint pen marks were made on the darkest and biggest circles  and then Lippy and the sentiment were added.


You may be aware that I have created a few of these girls on the same backgrounds, just altering the colour ways. I decided at the outset that I would like to make a little project from them and chose a small cube storage box to decorate. Here are all 5 of my girls on the final piece:


Lippy


and the rest of the gang:

Cate and Canine                   Cat Girl                   Blondie                       Sabrina
     

I hope you'll come along and play on Vera Lane.
It's such a friendly, fun place to be!


Thanks for stopping by today.

xoxo

I'd like to play along in these challenges:

Allsorts #541 Spots/Stripes 19/10
Incy Wincy Designs Autumn Colours 19/10 TOP 5
Lil Patch of Crafty Friends #115AG 20/10
Aways Fun #132 Monochrome 20/10
Pammies Inky Pinkies #1941 AG 21/10 TOP 3
We Love 2 Create #10 AG 22/10
A Gem of a Challenge #20 AG 22/10 TOP 3

Angies Digital Stamps #36 AG Opt Fall Colours 25/10 TOP 3

Crafters Castle #22 AG Opt Fall 31/10
Cutie Pie #140 AG 04/10


***

Saturday, 26 August 2017

* Gecko Galz: By the Shore 2


Hello Crafty Friends!


Today is my feature day on the Gecko Galz blog.
Please pop over to see the fabulous projects by the talented Design Team - there is also a free digital stamp to collect every few days.


I've kept with the 'By The Shorecustomer challenge theme for my projects. I hope you like them and are inspired to join in with the challenge - we would love to see your projects!

First up is a wall hanging which has a vintage look and reminds me so much of holidays by the seaside when I was a child: 


I made this from beer mats which had a natural wood-look background - perfect for my project! I cut paper from the By The Shore paper pack - distressed and inked the edges, and attached it to the centre of each mat, leaving the 'wooden' border.  Holes were punched into the mats, so they could be held together with hemp twine which was roughly knotted. Some hessian trim was added to each of the three 'canvases'. A selection of resized images from  Beachy Jewels  and the Seaside Splendour digital kit were fussy cut, inked and glued onto the mats, some with foam pads for added dimension.
Here's a closer look at all 3 panels:


This shows the dimension of the collages:


Next I made a decorated box and matching card:


Here is the box:


The box is papier mache - I gave it a coat of gesso and when dry, painted it with gold water based acrylic. The lid of the box was decorated with an ornate die cut circle and topped with an enlarged image from the  Beachy Jewels  Collage Sheet. I love how versatile these Jewel collage sheets are, now that I've learned how to resize them in Gimp. (I watched and learned from You Tube tutorials by the lovely Heather Hudson). I printed out two of the resized turtle images, so that I could add a second turtle and seashell on foam pads. I treated the turtle's shell and the seashell with Glossy Accents to make them shine. I randomly added some small ivory pearls and a border of shiny crystal gems. I love all the sparkle!


My final project is a card:


My card is very simple, using one of the images (SSI05) from the Seaside Splendour digital kit. The image was printed, cut and the edges distressed with scissors and inked with Vintage Photo DI. It was matted onto ivory card which was distressed and inked. This was popped on foam tape onto the background, made from layers of By The Shore paper and more ivory card.  Ivory organza ribbon was secured to the patterned paper and a row of crystal gems attached. Four crystals were placed on the image, one in each corner. I like the simplicity of this card.

My other 'By the Shore' card can be viewed here.


By The Shore                     Beachy Jewels              Seaside Splendour        


I hope you'll join our 'By The Shore' challenge. The winner gets a whopping $25 shopping spree at the Gecko Galz shop.


The only rule is that you must use at least one Gecko Galz product (this can be one of the freebies, so check back through the blog and also look at the freebies on the Pinterest page, or of course you can buy at the Etsy store!) 
Also if you sign up for the Gecko Galz newsletter, you'll be able to claim a free collage sheet each month.


Please hop over to the Gecko Galz blog to see the fabulous designs by the very talented DT.

We also have a Private Facebook Group where there are 4 monthly challenges, each with a collage sheet prize. Come and join us!

I'll be back on the 1st September with more Gecko Galz projects.
Thanks for stopping by today.
xoxo


I'd like to play along in the following challenges: 

Wall Hanging  
TTCRD AG 29/08
Corrosive Challenges #8 AG 31/08
Jo's Scrapshack #203 AG 01/09 TOP 3

Hiding in my Craftroom #315 Any Holiday 01/09
Crafty Cardmakers Under the Sea/At the Beach 03/09 TOP 5

The Crafty Addicts #39 AG 05/09
DL Art  TT#211 Vacation 14/09
Creative Fingers #135 AG 08/09

Decorated Box & Matching Card  
Lil Patch of Crafty Friends #64 AG 29/09 
Dragonfly Dreams Animals 31/08
Craft Rocket #40 Animal Kingdom 31/08
613 Avenue Create #200 AG/Shabby Chic 02/09 TOP 3
Making Memories #8 AG 08/09
A Snowflake's Promise #43 AG 09/09


I'd really love some feedback :)      
I read and appreciate all your comments. 

To leave a comment, please click on the G+1 button below.
(If this does not open up the comments, please click either the link to this particular post in the sidebar, or click on the red heading at the top of the post and, hopefully, the comments will open).
Thanks x

SaveSave
SaveSave
SaveSave
SaveSave
SaveSave

Monday, 19 June 2017

* Vera Lane Studio: Mermaid Trinket Box

Hello friends!


Today is new release day at Vera Lane Studio!

Janet has created a new Mermaid set as part of the Floral Park Collection, and it is stunning! Check this out .... she can be topless or wear a bikini top!

I decided to make a decorated box:


My box is papier mache. I started by giving it a coat of white gesso and, when this was dry, I pained it with gold water-based paint. I added some Sparkling Wax in Apple Green and Mid Sky Blue. 

The lid was decorated with the Mermaid images which had been coloured with markers and fussy cut. 


The sentiment was cut into strips, the edges inked and all attached onto the lid with Decopatch glue. Once in place, a second coat of Decopatch glue was applied to seal the images. Some tiny pearls and crystal stars were added along with a border of crystal gems. Diamond Sparkle Medium was added last of all to give it some shimmer.


I hope you'll come along and play on Vera Lane. It's such a friendly, fun place to be!
You'll find us on Facebook in a closed group, which I invite you all to join! You can find us HERE
I guarantee, you'll get a very warm welcome!


Thanks for stopping by today.
xoxo

I'd like to play along in these challenges:

Creative Knockouts #198 AG 22/06
Creative Friday #180 Mythical Creatures 22/06 WINNER

 * Creative Fingers #132 AG 23/06
Kraftin Kimmie #386 Mermaids 24/06
Creative Moments #120 AG 25/06
Love To Create #12 25 /06
Lil Patch of Crafty Friends #60 AG 30/06
Dragonfly Dreams Add Sparkle 30/06
Corrosive Challenge AG 30/06
My Time to Craft #348 Summertime 30/06

I'd really love some feedback :)      
I read and appreciate all your comments. 

To leave a comment, please click on the G+1 button below.
(If this does not open up the comments, please click either the link to this particular post in the sidebar, or click on the red heading at the top of the post and, hopefully, the comments will open).

Thanks. x