Showing posts with label crackle paste. Show all posts

Monday, 20 November 2023

* Path of Positivity #117 Midway: Grown with Love


Hello

Welcome to the midway reminder for the November Path of Positivity Challenge.

Our challenge is always Anything Goes with an optional theme.

This month's option is to design a project that is inspired by TEXTURE.

Honours and Prizes include:

  • $6 worth of images from Scribbles Designs, for a person chosen in a random draw based on all qualifying entrants.
  • A badge for the following honours: Top PickVoter's ChoiceMost InspirationalRandom WinnerDT Delight.

Here is my midway DT project:


My project was totally inspired by watching some of Tracy Evans's YouTube videos. I love the stencilled, crackle paste, textured background and the vintage colours from the Distress Oxide ink spray. Tracy's video can be viewed here: Stencils and Texture. The boots and cyclamen are stamped and partially coloured with Inktense watercolour pencils, and this arrangement was inspired by Tracey's snippet video: Snippet #3.


That's all for now.
We would love to see your creations! 
Just make sure that your entry is positive, inspirational, motivational or encouraging in some way!
The link up is here: Challenge #117 Path of Positivity.


Many thanks to Scribbles Designs for sponsoring the challenge.


I'll be back with a another Path of Positivity project in a couple of weeks time.

Thanks for stopping by today!

xoxo 
I'd like to play along in these challenges:

 * Allsorts Challenge #755 AG 24/11

Pammies Inky Pinkies #2346 AG 26/11

Crafting from the Heart  #7 AG 26/11

613 Avenue Create Nov AG 28/11

A Perfect Time to Craft #11 AG 28/11 WINNER

Creative Fingers #266 AG 30/11

Let's Create and Craft #201 AG 30/11

The Crafting Challenge Nov AG 30/11

Lil Patch of Crafty Friends #218 AG 02/11

*Ally's Angels #76 AG 06/12 TOP PICK

 I read and appreciate all your comments. 

xoxo

Monday, 28 August 2023

Vera Lane Studio: Present, Patient, Peaceful


Hello

It's Monday and my Vera Lane Studio DT day. 

Today at Vera Lane Studio we have a new digi set release. The set is called called Present, Patient, Peaceful and features a lovely, long legged girl laying in the meadow, some grasses, a couple of flowers, a sun and a cloud. The three words 'Present, Patient, Peaceful' form the sentiment.

Here is my project:


I coloured the images with Copics and fussy cut them. I made the background by stamping with a stencil loaded with Oxide inks,. I added some white embossed hearts and some crackle texture hearts using an AALL & Create stencil. A little black stamping was added around the edges and lots of white splatters. I grounded my girl by making a shadow with with Inktense watercolour pencils.

Here is close up:


That's all for now.

I hope you'll come along and play on Vera Lane. It's such a friendly, fun place to be!


Here's all the info you need:

AALL & Create carry Janet's clear stamp sets, stencils and Washi Tape. 
A list of stockists can be found here.

I'd like to play along in these challenges:

Crafty Calendar Aug AG 28/08
613.Avenue Create Aug AG 31/08
A Gem of a Challenge #17 AG 01/09
Pammies Inky Pinkies #2334 AG 03/09
Allie's Angels #73 AG 10/09
We Love 2 Create #7 AG 30/09

Thanks for stopping by today.

xoxo

Monday, 6 March 2023

Vera Lane Studio: Einstein


 Hello

Welcome to my new follower, Ann Myers. 

Thank you so much for taking an interest in my blog.

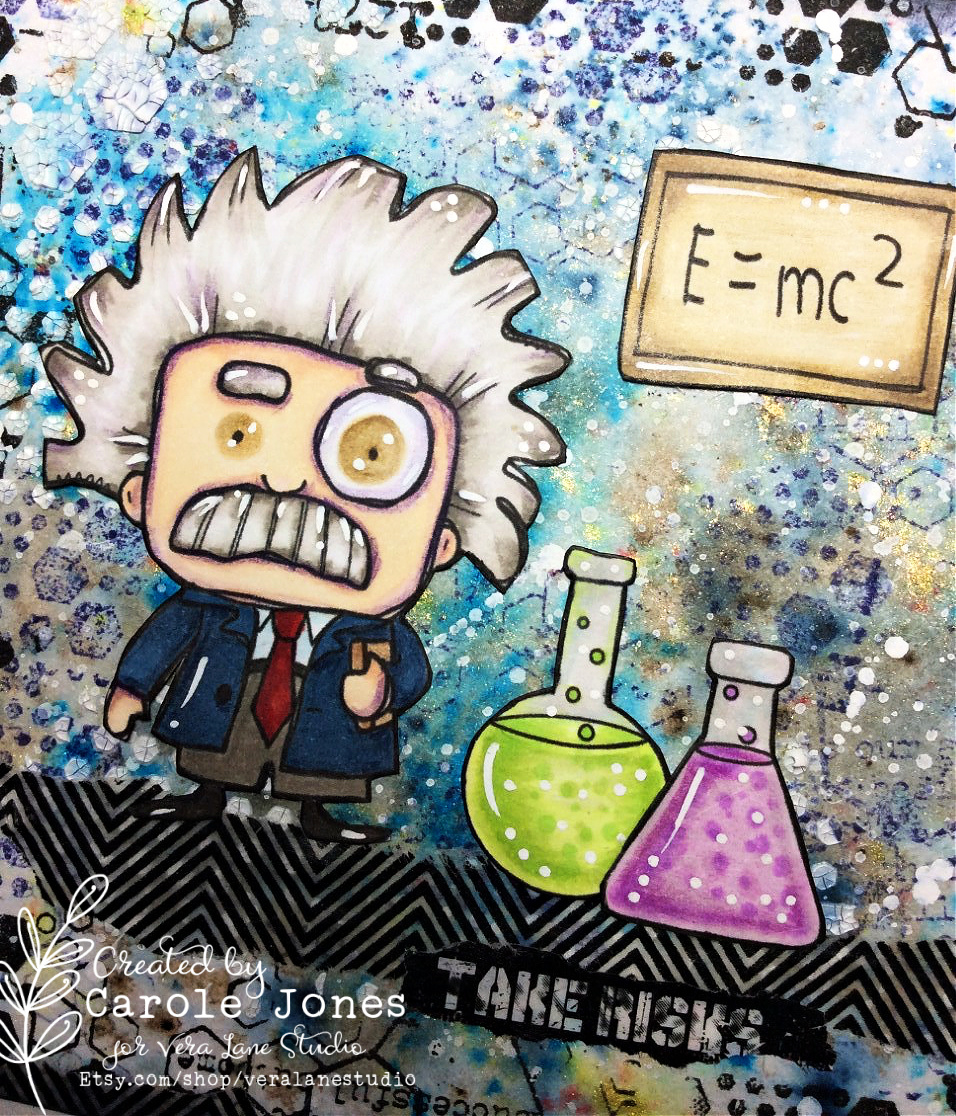
It's my DT day at Vera Lane Studio and I'm delighted to announce that Einstein is Janet's new digi release today.

I made a journal page:


I coloured the digis with Copics and added some pencil shading. The background was already in my scrap box and was made with Brushos and Infusions pigments, spritzed with water. I added some stamping and crackle paste stencilling using the Hexagon sets from AALL & Create, along with lots of white paint splatters.

I used washi tape to ground the character and his chemical flasks, and I added extra washi tape around the edges to create a border. I darkened the edges with black archival ink. The sentiment was cut into strips, inked  around the edges with a sponge and adhered.

Einstein


That's all for now.

I hope you'll come along and play on Vera Lane. It's such a friendly, fun place to be!


Here's all the info you need:

AALL & Create carry Janet's clear stamp sets, stencils and Washi Tape. 
A list of stockists can be found here.

I'd like to play along in these challenges:


Thanks for stopping by today.

xoxo

Thursday, 12 November 2020

AALL & Create: Lighthouse


 Hello!

Happy Thursday!

Today is my GDT day at AALL & Create and I have a mixed media project to share featuring the beautiful lighthouse from the Sea Essentials set and the lotus flowers from Lotus Clusters.

I love being beside the sea, and this lighthouse and the lotus flowers remind me of blustery days, big waves and sea spray.


Here are some close up photos:


 I added texture with heat embossing, texture paste, cheesecloth, arty stones and decoupaging the images. 


The lighthouse has foam tape down the centre and was gently shaped to add further texture and dimension.


I placed the piece a frame without glass so that I can display it.

How I made the project:

1. I painted the background with PaperArtsy Fresco paints, dabbing the paint onto the card with a baby wipe. 
2. I heat embossed the #444 Crashing Waves.
***
3. I stamped the lighthouse from #442 Sea Essentials onto the painted card.
4. I stamped another lighthouse and several lotus flowers from #441 Lotus Cluster set and fussy cut them.
***
5. I added some opaque crackle texture paste through the #39 Lotza Dots stencil.
***
6. I coloured the fussy cut images with Inktense pencils and a water brush. I left the lighthouse in black and white.
7. The Lighthouse was shaped by using foam tape and bending it slightly. It was adhered, with some cheesecloth behind it for texture, on top of the stamped lighthouse.
***
8. The two layers of flowers were arranged around the base of the lighthouse on top of some cheesecloth. Some Arty Stones were adhered in-between the flowers to emulate sea foam.
9. I stamped # 366 Roundly and #262 Mesh around the edges in Versafine Nocturne and inked all the edges in black.
10. Finally I matted the piece onto heavy black card and popped it into a frame with a white card backdrop.

Stamps Used:
#262 Mesh (Tracy Evans)
#366 Roundly (Autour de Mwa)
#441 Lotus Clusters (Bipasha BK)
#442 Sea Essentials (Bipasha BK)
#444 Crashing Waves (Bipasha BK)
Stencil Used:
#39 Lotza Dots (Autour de Mwa)


To see the stamps, stencils and dies used, please visit 
A list of stockists can be found here.

You'll find lots of inspiration on the 

That's all for now.
Thanks for stopping by today.
xoxo

I'd like to play along in these challenges:
The Sisterhood of Crafters Embossing 22/11
Penny's Challenges #484 AG 24/11
We Love 2 Create AG Mixed Media 24/11
Creative Artiste #66 AG MM 29/11
613 Avenue Create Cute Critters 30/11
Corrosive Challenges #11 AG 30/11


Thursday, 30 July 2020

* AALL & Create: Collect Beautiful Moments


Hello!

Today I am Guest Designer for AALL & Create

I have created an 8 x 10 inch mixed media piece on watercolour paper which I'm calling 'Collect Beautiful Moments'. The magnifying glass from stamp set # 319 and the tiny sentiment beneath it reminded me that most days we have to look really hard to see the little things that make us happy. In recent times there has not been much joy, but in each and every day there have been special moments that we should savour and remember. For me it might be bird song from the trees or raindrops glistening on leaves and flowers. 


Step by step:


1. The magnifying glass from #319 Magnify It was stamped onto watercolour paper and coloured with watercolours and Polychromo pencils. The image was fussy cut.
2. A second magnifying glass was stamped onto watercolour paper and the background given a wash of colour.
3. Crackle paste was applied through the # 91 Panache stencil.


4. More watercolours were applied to the background and over the crackle paste.
5. The background was stamped using #362 Splodge, #364 Intersecting Circles and #366 Roundly. Paint splatters were added.
6. The edges of the piece were inked with black ink and it was also applied lightly over the crackle to emphasise the texture (I forgot to take a photograph!)


8. Flower sprays from #324 Blooming Beauty were stamped and fussy cut, as was the Bee from # 330 Honeybee.
9.  #14 Cells were die cut in black and snipped to give some embellishments.
10 #350 Splattered Numbers were heat embossed in white on black card to provide more embellishments.  

11. The elements were adhered using glue and foam tape for dimension.
12. Three Tim Holtz stars were coloured with Red Pepper alcohol ink and adhered.
13. A Tim Holtz quote chip was also adhered as a sentiment.

***
Here are some close up photos:

I love the darling quote beneath the handle of the magnifying glass.
The bee was shaped, given two sets of wings and has a little Stickles on its top wings:


The crackle paste through the Panache stencil adds texture to the background:


The gunmetal stars were altered to red with alcohol ink:


The #14 Cells die cut can be snipped into sections to add as embellishments:


#350 Spattered Numbers when heat embossed makes perfect embellishments:


This shows the layers and dimension: 


To see the stamps, stencils and dies used, please visit 
AALL & Create Boutique.

You'll find lots of inspiration on the 
AALL & Create Facebook Page  and on Instagram

That's all for now.
Thanks for stopping by today.

xoxo

I'd like to play along in these challenges:


***


Friday, 10 April 2020

* Accordion Card with Janet Klein's Cuties


Hello!

Today I am delighted to be invited as Guest Designer on the Craft Stamper blog. Way back in February I made a watercolour floral card for their Take It, Make It challenge, and was chosen as winner. Being GDT is one of the prizes.

I decided make an accordion card using quirky, cute character stamps designed by Janet Klein and available through AALL & Create.  Each stamp set features a whimsical character, a beautiful sentiment and ephemera elements that are fabulous for mixing and matching with other characters.

Here is the front and back cover:


and here is the accordion centre:


Aren't these characters adorable!
The accordion is the easiest to make. It is two square cards. One simply has the front and the back folded in half to make four sections. The first and fourth section are glued to the front and back of the second card.

I coloured the characters and all the elements with Copic markers, adding highlight details with a white Posca pen. The images were fussy cut up to the black line.
The backgrounds were made by smooshing Distress Oxides and water (Picked Raspberry, Scattered Straw and Fossilised Amber). Once dry, I added some background stamping using Heartfelt #304  and Bubble Block #310, both AALL & Create products. The edges of each background are inked in black archival ink to add a frame. The sentiments were cut into strips, inked and added to the backgrounds. Each background was matted onto black card and adhered to the white card base.

The front and back also has crackle paste through the Lotsa Dotz #39 stencil.

Here are close ups of the pages.

The front uses The Giving Heart #298:


and the back uses Simple but Significant #297:


The inside features two of Janet's boys. 
Here is All Good Things #296:


and here is Oh Boy! #316:


Janet Klein, the designer of these stamps, is also the owner of Vera Lane Studio.

Thanks for stopping by!
xoxo

                                                                                                                                            
I'd like to play along in these challenges:

Lil Patch of Crafty Friends #129 AG 17/04 
Alphabet Challenge A for AG 23/04
Cardz TV #112 AG 24/04
Love 2 Create #4 AG MM 27/04 TOP 3

Stinkin Inkers Crafter's Choice 28/04 TOP 3

Classic Design Challenge #4 AG 29/04
Let's Craft and Create #158 AG 30/04
613 Avenue Create #232 AG 30/04
Love to Craft #45 (1/5) AG 30/04

I'd really love some feedback :)      
I read and appreciate all your comments. 

xoxo

Monday, 16 March 2020

* Vera Lane Studio: Alice and White Rabbit


Hello!

I hope this Monday finds everyone safe and well. 

It's a new release day at Vera Lane Studio and that time of year when Alice appears everywhere! Janet has created a 3 digi stamp set called Alice and White Rabbit and I have used all 3 digis in my art journal page.

In my scene, Alice has fallen down the rabbit hole and has had time to straighten herself out before the White Rabbit comes rushing by!


I started the page by collaging some book paper, then adding crackle texture paste through a leafy stencil. Once this was dry, I sprinkled PaperArtsy Infusions in Emerald Isle over the page and spritzed with water. I popped a circle mask over the page and added Neocolours in teals and dark greens around the outside.
I highlighted the leaves with Posca Pens in both black and white and added some Inktense Pencil colours to help them stand out a little more. Some stamping with a PaperArtsy flourish stamp along the edges of the page and some paint splatters finish off the background.


Alice and the White Rabbit are coloured with Copic markers and fussy cut. They are glued directly onto the page with some Prills and Gel Medium to ground them, representing the tunnel floor.


The sentiment is part of this digi set. I cut it into strips and inked the edges with black ink. The strips are glued onto the background and I went around the words with a black fine liner.

Alice and White Rabbit

I hope you'll come along and play on Vera Lane.
It's such a friendly, fun place to be!


Thanks for stopping by today.

xoxo

I'd like to play along in these challenges:

All Fun Challenges #4 AG 21/03
A Gem of a Challenge AG 24/03
Color it, Create it, Show it off March AG 29/03
A Bit More Time To Craft Extra March AG 30/03
Your Scrapbook Place March 30/03
Love to Scrap #131 AG 30/03
Lil Patch of Crafty Friends #128 AG 04/04
World Wide Open DT Challenge AG 12/04


***