Tuesday, 28 March 2017

{Pin}aspirational Challenges: Little Miss Mouse

Hello!

 
Today is the start of a new challenge at 

{PIN}spirational Challenges.

Challenge #187 runs for 2 weeks until 10th April.


Here is the inspiration photo:


We are kindly sponsored by the Elisabeth Bell.
Please pop along and check out the gorgeous stamps available.


I used a beautiful image from Elisabeth Bell called Little Miss Mouse:


I made a card with a die-cut, scalloped square aperture in the front and placed the image behind it. A larger scalloped square was cut out of patterned paper and when adhered to the front it left a frame around the aperture. The image was coloured with Spectrum Noir markers. A vellum butterfly and flower were used as embellishments and placed overlapping the aperture.

 That's all from me today.  hope you'll pop over to 
to check out the gorgeous designs by the rest of the DT. 

We would love for you to take part in the challenge!

Thanks for stopping by today. 
xoxo


I'd like to play along in these challenges:

CAGI Challenge  Spring Time 01/04 TOP PICK
Crafting From The Heart Challenge #152 AG 02/04
Pammies Inky Pinkies Challenges #1713 02/04
Cutie Pie Challenge #109 Dies and Digis 02/04
Crafty Cardmakers #185 Spring into Spring 09/04

I'd really love some feedback :)      
I read and appreciate all your comments. 

To leave a comment, please click on the G+1 button below.
(If this does not open up the comments, please click either the link to this particular post in the sidebar, or click on the red heading at the top of the post and, hopefully, the comments will open).
Thanks x

Monday, 27 March 2017

Vera Lane Studio: Tinker Sisters & Love The Bones Of You

Hello!

This last week I had 'issues' with my laptop, so I'm apologising for not commenting on some of your blogs - all is back to normal now, so hopefully I'll be able to catch up.


Today I'm sharing another DT project for Vera Lane Studio.

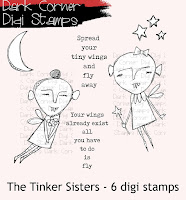
Again this week we are celebrating Vera Lane's 'Dark Corner'. Pop over to the shop to check out the creepy-cute Dark Corner characters.  Today sees the release of 2 new Dark Corner sets: 

                    Tinker Sisters         Zombie Accessory Pack 
          

My first make features the Tinker Sisters - two weird, but wonderful zombie fairies (is there such a thing?) Actually, in a funny way - these two reming me of my sister and I - that's wrong ... very wrong, but there it is!


I made a journal page using Brushos and paint splatters for the starry background. The sisters were coloured and fussy cut, then glued directly onto the page. The sentiment is one of two which comes with the set. The border is from Vera's Border Set.


My second make features elements from the new Zombie Accessory Set. So many elements in this set makes it extremely good value; there is a gravestone, a creepy hand, a skull, a happy fly trap and three sentiments - they can be mixed and matched in so many ways with other Dark Corner sets.


 I know my make is not very 'dark' as that is not my style, I've gone more for creepy-cute! In this one I like the idea of the faithful dog at his master's grave.
The background is a gelli print. All elements were coloured with alcohol markers and fussy cut. Carlos (the dog) is from the Hayes and Carlos set. The sentiment is computer generated apart from the word 'bones' which I found on Google images (here).

Here are the sets I used in this week's creations:

      
Vera's Borders


I hope you'll come along and play on Vera Lane. It's such a friendly, fun place to be!
You'll find us on Facebook in a closed group, which I invite you all to join! You can find us HERE
I guarantee, you'll get a very warm welcome!


Thanks for stopping by today.
xoxo

I'd like to play along in these challenges:

Crafty Gals Corner Challenges Anything but a Card 28/03
Inspiration Destination Challenge #124 AG 29/03
Love2create #6 AG Mixed Media 01/04 (16/04)
Corrosive Challenges #3 AG 02/04


I'd really love some feedback :)      
I read and appreciate all your comments. 

To leave a comment, please click on the G+1 button below.
(If this does not open up the comments, please click either the link to this particular post in the sidebar, or click on the red heading at the top of the post and, hopefully, the comments will open).
Thanks x

Sunday, 26 March 2017

Gecko Galz: Springtime

Hello!

 It's my turn to post for the DT at Gecko Galz.

This month our customer challenge theme is Fairy Garden and you still have a few days left to enter.

Here is one of the cards I made:


For this card, I used an image from the Pretty Birds Collage set and paper, called Relax,  from the Solarium Paper Pack. I matted the image and background paper onto textured green card and distressed and inked the edges. Some frayed linen was added beneath the image for texture. Lacey flowers were adhered along the side edge of the card and jumbo pearls added to the centres. Some paper blooms and leaves were die cut, coloured and added, along with a wooden butterfly as a finishing touch.


This Fairy Garden card was featured earlier this month and you can read about it here:


The next card features the Fairy of March digital stamp. 


I coloured her with alcohol markers and pencils, then fussy cut her, leaving a thin white border. She was adhered on foam pads onto the background of plaid paper from the Easter Eggs paper pack. This in turn was matted onto textured lavender card. Some shop bought flowers were scattered around the image.


And finally, I made two quick and easy Springtime cards using images from the Spring Beauties collage set:


This image is from the Spring Beauties Collage Set and the Esmerelda paper is from the Gypsy Market Paper pack. 


Glitter was added to the flowers and to the dress. The image was then inked and matted onto black and then marigold card. A doily was cut in half and attached at the top and bottom of the image mat. The image was then adhered to the background paper on foam pads. Lace was added along the side edge and a die cut flower with a lace flower was added to finish it off.


This image is from the Spring Beauties Collage Set and the paper, called The Greenhouse, is from the Solarium Paper pack. 


Again glitter was added to the flowers, then the edges of the image inked. It was matted onto black and then pink card and a doily half attached at the top and bottom. Foam pads secure the image to the background paper and lace was added along the card edge. A die cut flower made from hand-made faux mother of pearl card was attached with a pearl to complete the card.


That's all from me until next time.
Please join our Fairy Garden Challenge here.
The winner gets a whopping $25 shopping spree at the Gecko Galz shop.


Here are links to the products that I used:

Easter Eggs Paper                Fairy of March stamp
      

Pretty Birds Collage Set                       Spring Beauties Collage Set
     

Gypsy Market Paper                        Solarium Paper
        

Please hop over to the Gecko Galz blog to see the fabulous designs by the very talented DT.

Here's all the info you need:


Thanks for stopping by today. 
xoxo

I'd like to play along in these challenges:

Brown Sugar Challenge #243 AG 30/03
Crafty Friends Challenge #54 B is for... (Bird, Blossom, Butterfly) 07/04
Crazy4challenges Owls/Feathered Creatures 31/03
Making Memories Crafting Add Some Layers 05/04

The Fairy and The Unicorn Challenge JFF March 31/03
Alphabet Challenge A = Anything with Wings 31/03
Dragon's Lair Designs Challenge  AG with Spring Flowers 05/04

Crafting With Friends #39 AG 31/03
Creative Fingers Challenge #126 AG 31/03
Jo's Scrapshack #181 AG 01/04


I'd really love some feedback :)      
I read and appreciate all your comments. 

To leave a comment, please click on the G+1 button below.

(If this does not open up the comments, please click either the link to this particular post in the sidebar, or click on the red heading at the top of the post and, hopefully, the comments will open).
Thanks x

Thursday, 23 March 2017

If You Give A Crafter A Cookie: Little Patch Puppy

Hello!


Today is the start of a brand new challenge at 
If You Give A Crafter A Cookie.
I hope you'll join us.

You can enter your projects until the 6th April.

 Here is the inspiration photo:


This time we are sponsored by the wonderful All Dressed Up


I was lucky to get an image to work with and I chose Little Patch Puppy.  
Here is my card:


 I coloured the puppy image using Spectrum Noir markers. For his body I used a dotty technique. Once coloured, he was fussy cut leaving a thin white border and attached to the background on foam pads.


 I made the background to look like a patchwork quilt. This was done by cutting and gluing 1 inch strips of patterned paper side by side. The diagrams below show how this was done:

Step 1: Cut 1 inch strips from two different patterned papers  and glue side by side:
Step 2: Cut across the strips as shown below:


Step 3: Align the strips as follows and trim as required:

A ribbon was placed diagonally across the top corner and a double bow attached. To finish off, a Papermania sentiment was added along with two pink daisies.

That's all from me for today. Now it's over to you...

Please pop over to the 
If You Give A Crafter A Cookie
challenge blog to check out the lovely designs by the rest of the DT. 

We would love for you to share your projects in the challenge! 

You could win digi stamps or become one of our 'Top Cookies'!

Thanks for stopping by today! 
xoxo

I'd like to play along in these challenges:

Kraftin Kimmie's Wonderful Wednesday AG 28/03
Penny's Challenges #321 AG 28/03
Crafty Creations Challenges #337 AG 28/03 x
A Perfect Time To Craft March AG 28/03 x
A Bit More Time To Craft #40 AG 29/03 x
Crafty Hazelnut's Patterned Paper AG 31/03 x
Creative Ladybird's Creations #24 AG 31/03 x
Creative Moments #114 AG/Spring Colours 03/04 x
Creative Inspirations #271 AG 04/04 x


I'd really love some feedback :)      
I read and appreciate all your comments. 

To leave a comment, please click on the G+1 button below.
(If this does not open up the comments, please click either the link to this particular post in the sidebar, or click on the red heading at the top of the post and, hopefully, the comments will open).

Thanks x

Tuesday, 21 March 2017

Guest Designer at Deep Ocean Challenges: VLS The Gardner

Hello!

I am thrilled to be guest designer at 
Deep Ocean Challenges

The theme for the challenge is "Flowers Everywhere", so, I chose to use a quirky set of digital images from Vera Lane Studio called The Gardener

Here is my card: 


I love the sentiment and the little gardener image which I coloured with alcohol pens and blendable pencils. I decided that the gardener needed lots of flowers and so I resized and printed out several different sizes of flower heads from the Blooms set. Once these had been coloured and fussy cut, I shaped them on a pad using a stylus pen and added some Glossy Accents to their centres. The flowers were glued directly onto the background, whilst the word 'GROW' and the image were attached on foam pads.


The background was made by spinkling Brushos onto card and spritzing with water. The card was matted onto black card to give a thin border and it was then attached to the base card.

The Gardener                              Blooms


I hope you'll come along and play on Vera Lane. It's such a friendly, fun place to be!
You'll find us on Facebook in a closed group, which I invite you all to join! You can find us HERE

I guarantee, you'll get a very warm welcome!


Thanks for stopping by today.
xoxo

I'd like to play along in these challenges:

Oo La La Creations Challenges #224 Spring is in The Air 25/03
Crafting From The Heart #151 AG 26/03
Tuesday Throwdown #335 Add Dimension 27/03
Fab n Funky Challenges #343 Flowers 28/03
ModSquad Challenge Plant Kindness 28/03
Creative Friday #175 Flowers 30/03
Creative Fingers Challenge #126 AG 30/03 ---
Fussy And Fancy Challenge #183 Springtime 30/03
The Paper Nest Dolls Challenge March AG 31/03
Inky Chicks #80 Flowers 31/03
Classic Design Team Challenge 31/03


I'd really love some feedback :)      
I read and appreciate all your comments. 

To leave a comment, please click on the G+1 button below.
(If this does not open up the comments, please click either the link to this particular post in the sidebar, or click on the red heading at the top of the post and, hopefully, the comments will open).

Thanks x

Monday, 20 March 2017

Vera Lane Studio: Caroline's Cupcakes

Hello!

I'm showing a DT project for Vera Lane Studio today. 
The gorgeous Caroline's Cupcakes is a brand new release:


I made two cards:


The images were coloured with alcohol markers and pencils. Glitter and glossy accents were applied and, when fussy cut, they were applied on foam pads onto the backgrounds.

The backgrounds were made by stamping with an embossing folder. (Open your chosen folder, and ink with distress inks, then lightly spritz with water. Close the folder and run it through through the embossing machine.) Once dry, I sprayed the embossed card with Glimmer Mist to give it a lovely shimmery finish.  On the second card I swiped an ink pad over the raised embossed areas.

The backgrounds were matted onto coloured textured card and then onto charcoal-grey card.  The sentiments were cut into strips and inked, then glued directly onto the background.

These close up photos show the shimmer a little better:


I hope you'll come along and play on Vera Lane. It's such a friendly, fun place to be!
You'll find us on Facebook in a closed group, which I invite you all to join! You can find us HERE
I guarantee, you'll get a very warm welcome!


Thanks for stopping by today.
xoxo

I'd like to play along in these challenges:

Card 1
Brown Sugar Challenge #242 AG 24/03
CAGI Challenge AG 25/03
Glitter n Sparkle Challenge #231 AG 26/03
Craft Rocket Challenges #35 Make it Feminine 28/03
Lil Patch Of Crafty Friends #54 AG 01/04


Card 2
Crafty Catz Challenge #162 AG/Touch of Pink 24/03 WINNER
Jo's Scrapshack #180 AG 25/03
Crafting From The Heart Challenge #151 AG 27/03
Pammie's Inky Pinkies Challenges #1712 AG 27/03
Scrappers Delights Challenge #64 AG 01/04


I'd really love some feedback :)      
I read and appreciate all your comments. 

To leave a comment, please click on the G+1 button below.
(If this does not open up the comments, please click either the link to this particular post in the sidebar, or click on the red heading at the top of the post and, hopefully, the comments will open).
Thanks x